Friday, June 24, 2011

Three in a row....

Just a quick post..... need to get back to making more things so I can post more!!


Here is another card I made with the Triple layer flower punch. This card I made in another challenge I did. There are soo many things you can do with this punch. I also used the Bold blossom stamp set that coordinates with the punch.


Going to try and get creative in my craft studio for a while today.....until next time... :-)

Happy crafting,
Gail

Tuesday, June 7, 2011

Triple punch flowers


This is a card that I made using one of the new triple punches from Stampin' Up! I absolutly love the punch. You can get many looks from the one punch using the three designs. The punch coordinates with the stamp set Bold Blossoms that was also used on this card.


My girl friend came over one afternoon for some much needed "girl time". It was such a nice relaxing time....we sat,chatted and stamped. This is the card we made and she loved it too.


Now I am off to make my swaps for a meeting I am going to this weekend. After they are done I will post a picture of them. I am using this punch on the card too.


Happy crafting,

Gail

Tuesday, May 24, 2011

Best Dad


Here is a card that I made before I got sick. I am trying to get back into it. My first step was to clean up down in my craft studio so I actually have a place to stamp. Now that is done I am hoping to have a few good days to make up some cards. I really do miss it,but when you are just not feeling good it is hard to be creative in any way shape or form.


Any way on to the card.......


I used the new stamp from Stampin' Up! called Sail Away. It is a single stamp and I absolutely love it!! I stamped it on very vanilla card stock and used my wonder color crayons and an aqua pen to color it in. After it was done and dry I ran it through my big shot with the square lattice embossing folder. I also ran the other piece of very vanilla through the EB folder to give it more texture. The colored card stock I used was Night of Navy.


It is an easy card to make and I think the look is nice and subtle with the watercolor look. I never seem to have enough stamps to make masculine cards and I think that this stamp is one perfect one to add to my large and ever growing stamp collection.


Hope you enjoy it and .....

Happy crafting,

Gail

Thursday, May 19, 2011

Moving slow,but back.....

I have so wanted to get back into posting on my blog and stamping. It has been a long couple of weeks. I am slowly getting my energy back and hope to get my mojo back for stamping.

On Sunday May 1st I woke up around 5am with severe pain on my left side. I had no idea what it could be and was hoping it would just go away. Needless to say that it didn't. My husband took me to the walk in clinic at our doctors office(that just happened to be across from the ER), and after he checked me out he sent me over to the ER. They ended up running a catscan and found out that I had diverticulitus. They admitted me into the hospital and I was there for a week. Let me just say if you have never had diverticulitus it is something you do NOT want to ever get. It has taken me awhile now to just start to feel better. I have to watch what I eat until everything heals then I am on a high fiber diet and hope to never have another attack.

So now that you know where I have been.....I am hoping to start stamping and posting regularly very soon. Taking care of the boys takes all my energy right now. I plan on trying to get into my craft studio this weekend. As soon as I do I will post what I do.

Thanks for understanding why I have not been posting and happy crafting to you!!
Gail

Monday, April 25, 2011

Paint Chips and Cards

I remember reading awhile back how you can use paint chips from the various stores on your cards. I have been going to those stores to get paint and decided to get a few extra paint chips to try on a card. I knew exactly what stamp I was going to use on the card,which did make it alittle easier when it came to deciding on the color paint chips to get. I wanted to make a masculine card with a new Stampin' Up! stamp that is in the new summer mini and will be able to be bought on May 1st. It is called Sail Away. It is perfect to use for making a masculine card....love it!!!


I first stamped the image on whisper white card stock and I used watercolor wonder crayons and an aqua painter to color it in. After it was done I ran it through the big shot in one of my favorite embossing folders(square lattice). After I decided which paint chip to use(you know I had to get more than one...ok more than a few lol),I decided to tear the sides to give it a more "natural" look....the straigh cut look just was not doing it for me. Now I didn't want to add too much to the card, but it still needed something to the back ground of the card. That is when I went I got out my color spritzer tool and markers. I spritzed my card a bit and it added just the right amount on the card stock to give it the look I was going for. I put the card together,added the saying, the button and my masculine card was complete.


It was a simple, easy and quick card to make. I will be making some more of these and I am going to try some different colors on it too. I also can't wait to see what other cards I will be using my other paint chips on.....I got them....now I have to use them! LOL


Happy crafting,

Gail


Supplies:


CS: Whisper white,Crumb Cake

Stamp: Sail Away

Ink: Black,Soft Suede

Markers: Soft Suede,Not Quite Navy

Accessories: Watercolor wonder crayons,aqua painter,square lattice embossing folder,paint chip,button


All supplies from SU! except paint chip and button

Wednesday, April 13, 2011

Cake anyone?......


I wish I could say that I came up with this card idea/layout myself....but I can not take credit for it. I saw this card on another blog(stamping with Di) and from my up line. I did see it awhile back and did not have this stamp set at that time. When I did get the set I knew it was one I had to CASE.


I used my watercolor wonder crayons on the cakes. I am really having fun with them!!


Doing the "awning" part of the card was alittle of a challenge since I was trying to get it perfect. It is so worth the look though!! You have got to try it.


Today I am going to try and make a card for another challenge. I am also going to play with some of the new stamp sets and punches that arrived at my house yesterday from my lovely UPS guy....gotta love those guys!! The new items that I got are from the summer mini and you can start to order them May 1st. They are awesome...wait until you see.


Hope you all find some time to do alittle card making/crafting yourself today too!!!


Happy crafting,

Gail


Supplies:

Stamp set:Birthday Bakery

Card stock: Whisper White,Pretty in Pink,Chocolate Chip

Ink: Black

Accessories: watercolor wonder crayons,aqua painter,modern label punch,word window punch,border punch,square lattice embossing folder

Monday, April 11, 2011

My first challenge card


I have always wanted to try doing a card for a challenge. I aways see all these great cards and love them. Last week I finally decided to make the time and do one instead of just wanting to do one. I am so glad that I did. It was fun and gave me another idea for a layout for other cards. In fact I had to make a card for a birthday party my one son went to on Friday night. It was alot quicker to make one since I already knew the layout of it. Of course I was running late and did not remember to take a picture of it.:-(


I used my watercolor wonder crayons on this card like the last one I posted. You will also notice that it is the same set of stamps....just different stamp used. I guess I was on a roll with both the set and the crayons...LOL!


Today I am hoping to make some more cards. First I have some paper work I have to go through.....I just hate it when the paper work gets in the way of the "playing", don't you?


Have a great day and here's to Happy crafting!

Gail


Supplies:

Stamp set: Morning Cup

Card stock: Poppy Parade,Not Quite Navy and Whisper White,DSP-Poppy Parade

Ink: Black

Accessories: Swiss dot embossing folder,white grosgrain ribbon,watercolor wonder crayons,aqua painter

All supplies from Stampin' Up!

Saturday, April 9, 2011

Love my vitamin!!!


This a card I made the other day with a set that I have had for a little while. It is a set with coffee and tea in it. When I saw the coffee cups and the sayings I knew it was one that I would get. There is just something about the coffee theme that I am really liking. Even bought some coffee decor items for my kitchen.


I colored the stack of cups in with an aqua painter and watercolor wonder crayons. I loved the look and it was so easy. I have had the watercolor wonder crayons for sometime now and didn't use them until last week. I'm sorry I waited this long and I know I will be using them alot more. They are so easy to use with the water pen or with blender pens from Stampin' Up! I still have to play with them some more. There are a few other ways to use them and I will let you know how that goes and what they are after I do it.


So now that I have posted this,it has made me want a nice hot cup of coffee. I think Hazelnut decaf is calling me from the kitchen right now!! LOL I usually drink regular not decaf, and could use the caffeine now,but it is getting alittle late and I would really like to sleep tonight. So with that, I think I will go get my coffee and go relax.....or maybe go make a card with my coffee in one hand and a stamp in the other.


Happy crafting,

Gail


Supplies:

Card stock: Night of Navy,Rose Red and Whisper White

Ink: Black

Accessories: Watercolor Wonder Crayons,aqua painter,modern tag punch, dot embossing folder

Tuesday, April 5, 2011

Pink,Simple and Elegant


The stamp set I used to make this card is called Strength and Hope. It is a new set from Stampin' Up! and when I saw it I just knew I had to order it. For every set SU! sells,they are donating $2 to the Breast Cancer Foundation. This foundation is very near and dear to my heart.


My sister was diagnosed with breast cancer this past summer. She has gone through an operation,chemo,radiation and is now on the longest part of her journey...taking meds everyday for the rest of her life to keep the cancer(hopefully,God willing) from coming back. Through it all she was positive and kept her Mary Kay business going. I am so proud of her and she is an inspiration to me and many other people too. Love you sis!!!


With making the card I knew I wanted to make it simple but some what elegant and of course pink. I used the embossing folder and then sponged pink on it to give it alittle more color and the elegant look. The H stamp has the word HOPE under it. It is small and hard to see in the picture. I used the other stamps on the inside...of course I didn't think to take a picture of the inside of the card. I will have to add that another day.


If anyone would like to get this stamp to help the breast cancer foundation let me know and I would be more than happy to help you with that. It really is a great cause.


Happy crafting,

Gail


Supplies:

Stamp set: Strength and Hope

Card stock: Pink Pirouette,whisper white

Ink: Pink Pirouette

Accessories: Pretty in Pink and white grosgrain ribbon,vintage wallpaper embossing folder,scallop punch,sponge

Saturday, April 2, 2011

Embossing folder pop.....


I was planning on posting this card yesterday but never got a chance since I had a sick son home from school. I actually have two sick sons home now.....it is so nice that they love to share their sickness! LOL I gave them jello, a drink and said I need five minutes to myself. So here I am.


Ok enough of that and on to the real stuff....the card.


I've seen cards using this technique with the embossing folders and have wanted to try it but have been doing other techniques first. I finally used it the other day. Another easy way of making something you have used differently and giving you a new look. It really makes the embossed part of the card stand out that much more. I can't wait to try it with other color inks and on my other embossing folders. Give it a try and see what you think.....have fun with it!


Happy crafting,

Gail


Supplies used on card:

Card stock: Crumb Cake, Rose Red,Whisper White

Ink: Crumb Cake

Markers: Rose Red,Soft Suede,So Saffron

Stamp Set: Eastern Blooms

Asseccories: 1/2 " seam binding..rose red, pearls,vintage wallpaper embossing folder,brayer

Thursday, March 31, 2011

Coffee and Mornings go together!


I don't know about you,but the saying on this card is so me!! I get up in the morning and one of the first things I do is turn on the Keurig.Gotta love how fast it is to get that cup of coffee.


Ok enough about the coffee and on to the card. I saw this technique yesterday and had to try it. It took alittle time to do it,but it was easy and I love the results. It was fun to do too. It actually took me longer to decide what image to stamp and color then it did to do the back ground.


So after deciding the image, stamping it and coloring it in, it was on to placement on the card. I had decided on putting twine on the card and it was just not going around it right. I ended up using a double sided tape runner and tape a piece of plain white copy paper and then lining up the twine very close to each other until I had the thickness I wanted. After that I trimmed the ends even and taped that onto the card. I added the flower and placed a pearl in the middle of it to match the tiny pearl in the middle of the flower on the cup.


I love trying different techniques and this is definitely one that I will be doing again.


Happy crafting,

Gail

Wednesday, March 30, 2011

Happy Easter


Here is another card that I made using the set Easter Blossoms. I also did the distressing on the card. With this card I did not add any ink to the edges like I did on the card in the last post. I think it gives a "softer" look to the distressing. It is amazing how just "roughing" up the edges abit adds so much to the look of a card.

I added some 1/2" seam binding to the front of the card. All I did to get it to look the way it does was to put some stick strip tape on the card where I wanted to place the seam binding and then just keep"folding"the seam binding loosely over the tape. It is another easy way to embellish your card and it will/can look different everytime you do it. There is not right or wrong way to make it look. Love that!!!


Now I will be off to the craft studio again to do some more work....or playing as my 6 and soon to be 8 year old boys tell me when I say I am "working".


Happy crafting,

Gail


Supplies for card:

Stamp set: Easter Blossoms

Card stock: Rose Red,CrumbCake,Very Vanilla

Ink: Crumb Cake,Baja Breeze

Accessories: Baja Breeze 1/2" Seam Binding,pearls

Tuesday, March 29, 2011

The Distressed look....

I am so loving the distressed look on cards!! This card was fun and easy to do. All the edges of all pieces of card stock on the card are distressed using my bone folder. Yes I said my bone folder. Some of you might already use it this way,but for those of you that don't should give it a try. Just take your card stock and rub the side edge of the bone folder on the sides of the card stock. It will "rough" it up a bit. The more/harder you rub the more distressed look you will get. I then took the card stock and rubbed the edges in Early Espresso ink to give it a more worn look. I took the piece of card stock that I stamped the image on and crumbled it up(after stamping on it). I then took a sponge and sponged Early Espresso ink over the "creases" of the card stock. I did the same for the tag. For the flowers I used a blender pen and SU! pastels. That gave the flowers the soft color I was looking for. Now if you read my last post I used the same stamp set and said that I had made a card using it that was for spring. The stamp set is Easter Blossoms and I said that you could use the set for other cards not just for Easter cards. This is just one example of that. You could always put a birthday,thank you,happy mothers day saying or anything else you want.

Hope you enjoyed the card and now I am going to go and play with some stamps!
Happy crafting,
Gail

Supplies for card:


Card stock: Pink Piroutte,Early Espresso, Very Vanilla Ink: Early Espresso Classic Ink Pad Twine Large and Extra Large Tag punches Pearls Pastels w/Blender pen

Monday, March 28, 2011

Frame with a border punch!

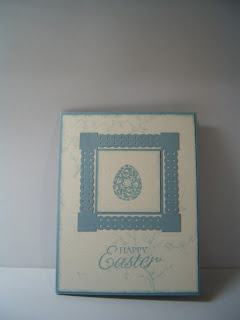
I went to regionals in Hartford Conn. on March 18th and had a blast. We got to see some of the new products coming out in the Summer mini that is out in May. We also got to see some new "tricks" with some items you might already own. One that I LOVE is making a frame using the Dotted Scallop Ribbon Border punch.This is one of my favorite border punches and when I saw how you can use it to make a frame I was super excited!!! It is so easy to do and gives your card a great new look while also giving your punch a new purpose. If you don't already have this border punch you need to get it.


Here is the card I made using it.


I used the stamp set called Easter Blossoms in the Occasions mini. Love it....you can use it for spring time cards,birthday,thinking of you,etc. It is not just an Easter card stamp set.

The card stock I used was Very Vanilla and Baja Breeze. Ink was also Baja Breeze

You can see how I used the border punch to make the frame that the egg is framed out with.


I hope you like the card and it makes you think of ways you might be able to use the punches you already have. I know it has made me think!!


Happy crafting,

Gail

Wednesday, March 16, 2011

Where it gets done.

I don't have a new card to show today,but thought I would show where I sit do make my cards. I love seeing where everyone else makes theres and wanted to share my spot too!
This is actually a work area my husband built with a friend when they did my studio. It still needs to be painted/stained but is functional. The top is a homemade counter top made of furniture grade plywood and trim. I absolutely love it!! It is nice and big so I can spread out...as you can see in the photo.
The counter top is built on top of two kitchen draw units that he found on clearance at Home Depot on one side(the side you are seeing) and on the other side there are four Ikea Trofast units that have there "cubbie draws" in it filled with tons of card/scrap booking supplies. On top of it I have all my current Stampin' Up! pads in the SU! ink pad holder that spins. On the wall is an old wooden cassette tape holder that I got at a yard sale years ago. My DH mounted it and trimmed it out on the wall. Above it he put in peg board so I can hang things and above that are small crates I got at Walmart that he also nailed to the wall and trimmed out. I have my new unmounted Stampin' Up! sets in them. They fit perfect and are easy to get to from where I am sitting. I will take a picture and post that another time.
I will take more pictures and share all the other parts of my new studio another day. I was hoping to wait until it is all painted and totally finished...BUT that may be awhile so I might have to show it before then.
Hope you like what you have seen so far....and here's to more in the future!
Happy crafting,
Gail

Monday, March 14, 2011

Another Owl Card


Here a is a card I made this past weekend. I used the extra large Owl Punch, and I have to say how much I love that little guy!! When I first saw the punch I thought it was cute but didn't think I would get it. I am sooo glad I did.
Another punch I used on this card is the Ribbon border punch. That is one that I love to use too. It is great to have when you want to add a piece of ribbon but might not have the color you want. You can grab a piece a card stock and make your own "piece of ribbon" from it. That is what I did on this card.
Supplies for the card were:
Chocolate Chip,Crumb Cake,Real Red,Marina Mist, Tangerine Tango & Very Vanilla card stock
Chocolate Chip ink for the saying
Extra Large Two step Owl punch,Modern Label Extra Large punch,Dotted Scallop Ribbon Border and Heart to Heart Extra Large Punch
Saying is the stamp from the Something to Celebrate Hostess level 2 set in the Occasions mini.
Square Lattice Embossing Folder with the Big Shot
Happy crafting,
Gail

Thursday, March 10, 2011

Black Magic

I made the cards below using the technique called Black Magic. It is a fun technique and it gives you beautiful results. For those of you out there that like coloring with your (watercolor) pencils,this one is for you!

This Friday I am having a class on this technique. The ladies will be making the yellow card. Some of them have seen the card and as soon as they did one said I'll be at that class...and she will be!

Today I made the pink card. I wanted to show how you can use primarily one color for the flowers or you can use many colors. Although it is the same stamp, using the different colors and putting them side by side like in the picture I think you get such a different look.

For the yellow flower card I used So Saffron, Tangerine Tango and Black card stock. The ink was stazon black for the sentiment and White craft ink for the flowers. I heat set the flowers and then colored the image with my watercolor pencils.

Now for the multicolor flower card I used Pretty in Pink,Whisper White and Black card stock.The inks were the same as with the other card along with the watercolor pencils. I used the Square Lattice Embossing Folder and Pretty in Pink and Black grosgrain ribbon on the card also. I also used Vanilla Shimmer Smooch Spritz on the black cs after I colored the flowers. You can see it better in the picture at the bottom. I wanted to add alittle something,but nothing too much or that would take away from the technique. The Smooch Spritz was just what it needed.

Hope you like the cards and give the Black Magic technique a try if you haven't already!

Happy crafting,

Gail

Tuesday, March 8, 2011

Inspiration from......

So where do you get your inspiration? What was the strangest place or thing it came from? I don't know that the inspiration for the card you are going to be seeing would be considered strange or not. I guess it would depend on where you get your inspiration from. The thing I got my inspiration from was my PJs. That's right. I was getting them out and all of a sudden a certain stamp set I own came to mind and I thought "wouldn't these colors look good with that set". I was finally able to get down to my craft room/studio last night and this is what I came up with.All supplies are from Stampin' Up! The stamp set is called Pocket Silhouettes. Card stock colors used are Pretty in Pink,Going Gray,Black,Rose Romance and Whisper White. Ink colors are Pretty in Pink(the light pink),Going Gray and Rose Romance. The ribbon is grosgrain Black and Pretty in Pink. It is alittle hard to see,but after I glue the black cs onto the whisper white cs I put them through my big shot with the Square Lattice Embossing Folder. I love how it gives it that extra little something without having to add more to it.

I surprised myself on how I was able to make this card and it didn't take me all night to do it. The idea came pretty easy this time.....we'll see about the next one...LOL!

Happy crafting,
Gail

Monday, March 7, 2011

Whoo Whoo!!

These are few cards that I made using the Extra Large Owl Punch. I am having a class at my house in my "Craft Studio" the last weekend in March. I'm really excited about it and I have about 8 people coming between the 2 days so far. I absolutly love this punch. It is one that I was not going to get and then once again I saw some things made using it and thought I'd give it a try....so glad I did! When I showed some of my friends the cards they all said sign me up.


Now on alittle side note....I said I am having the class in my "Craft Studio", I really call it my craft room.My husband refers to it as the "Craft Studio" because of everything in it and he did alot of the work with just him and a friend. I guess it really is more than just a room. There are new kitchen cabinets,handmade custom wooden counter tops, he came up with the design of hanging my ribbons and punches and many other things in the room. I have not taken pictures to post since nothing is either stained or painted yet. Still have to figure out what colors to stain/paint everything. Maybe I will take pictures and post before that all gets done(who knows how long it will be until it DOES get done...LOL). Maybe you guys can help suggest some color combos to stain/paint too!!!
Happy crafting,
Gail

Friday, March 4, 2011

Buzz Buzz.......

Here is another card that I used with a stamp set that I have had for sometime now and I think I have only used it once. It is called Just Buzzin' By. Another set that reminds me that spring is (hopefully) just around the corner.


I found this style card on another site(Patti Bennett's) and knew I wanted to try it. It is fun and different. It ties closed so the card will stay closed when it is given. Although I really do like the look, I think I am going to work on another way to keep it closed and see how it works. See you have to make sure you have enough ribbon to tie it with a nice bow. On this card my ribbon was a tad bit short so the bow is not exactly like I would like it to be. I wasn't going to waste the card or ruin it trying to take it apart and redo the ribbon(besides I hate to waste the ribbon too)so that is why the bow is the way it is. I will let you know if I come up with another idea on closing the card that I like and works well.
The card stock I used is Very Vanilla and Chocolate Chip, the ribbon is Vanilla grosgrain.
Any questions on the card just let me know......
Happy crafting,
Gail

Thursday, March 3, 2011

One and many more to come...


Here is s card I made using the stamp set called Season of Friendship. I really wasn't quite sure what I was going for when I started the card, and half way through I almost gave up. I decided not to and I am (pretty) happy with how the card came out.


I have said to myself that I either have to start using all the stamps I have or let them go. So with that being said I went to my many stamp sets that day and picked this set to work with. I am going to try and do that each week so you never know what set you might see being used. I am going to try and keep it to current sets, BUT......if you checked out my previous post you saw how many sets I have,so there may(oh heck there will) be times that you will see a card that is a retired set. I will let you know if that is the case. I can't let them go unloved just because they are retired right? LOL
Happy crafting,
Gail

Wednesday, March 2, 2011

How many do you have?

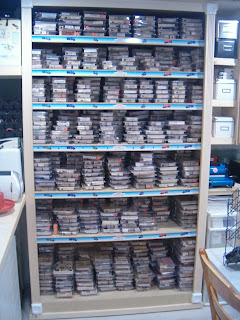
So awhile back on SCS there was a question asked about how many Stampin' Up! stamps do you own. There were alot of answers from "a few" to a number amount and then there was the old "too many to count". Well I am in the "too many to count" group. I suppose I COULD count them all, but I am afraid to really know how many sets I really do have. LOL


I have been a demonstrator with Stampin" Up! for over 10 years now. I started out as just a hobby demo. and now I am trying to make a go of it in the business way. My boys are getting older now so it is a little easier to focus on it as a business and not just a hobby. I have not gotten rid of even one stamp set that I have purchased from SU! (except if it was a double) in all the 10 years. Now that's alot of stamps!!! I took a picture so you can see what I mean. They are all in an old Thomas the Tank Engine display shelf that my DH bought from a store that was going out of business many years ago. It was used for my boys Thomas toys,but now that they are getting older and it is a good piece of "furniture" that can handle all the weight of all those stamps it was moved in to my craft studio we have been doing. I plan on covering the Thomas pictures with some scrap booking paper or wood trim. The front edges were train tracks and we covered them with some wood trim. It is a work in progress....as is the entire room still.
All the shelves but the top one have a back row of stamps and another row in front of them. The top row of stamps are all the stamps in the longer stamp containers. I have red dots on retired ones and need to add alot more red dots. What I need to do is put them in some sort of order and number them or something. It drives me crazy when I can't find the set I want!
Well I hope you enjoyed the picture. Maybe I will count them and everyone can guess as to how many they think are there. I might even have to give a set away to the person who comes the closet....what do you think? Some haven't even been put together yet!!!
Happy crafting,
Gail

Having fun playing with......


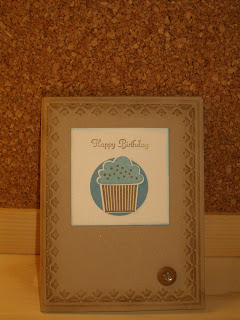
My new cupcake stamp set and matching punch. I wanted to get both the stamp set and the punch when I saw it in the Occassions mini and saw some of the cards other ladies have made. I am soo happy that I did get it. I am planning on having a class where you will go home with both stamp set and punch at the end of the class, along of course with some hand made cards! Here is one of the cards I have made and will post more as I make them. I will also post details on when the class will be and the cost of it.


I have a class already planned and set for the end of this month(March) using the Owl punch. Another FUN punch to own!! Love mine. Will post pictures of the cards using it in another post alittle later.
Happy crafting,
Gail