Saturday, April 9, 2011

Love my vitamin!!!


This a card I made the other day with a set that I have had for a little while. It is a set with coffee and tea in it. When I saw the coffee cups and the sayings I knew it was one that I would get. There is just something about the coffee theme that I am really liking. Even bought some coffee decor items for my kitchen.


I colored the stack of cups in with an aqua painter and watercolor wonder crayons. I loved the look and it was so easy. I have had the watercolor wonder crayons for sometime now and didn't use them until last week. I'm sorry I waited this long and I know I will be using them alot more. They are so easy to use with the water pen or with blender pens from Stampin' Up! I still have to play with them some more. There are a few other ways to use them and I will let you know how that goes and what they are after I do it.


So now that I have posted this,it has made me want a nice hot cup of coffee. I think Hazelnut decaf is calling me from the kitchen right now!! LOL I usually drink regular not decaf, and could use the caffeine now,but it is getting alittle late and I would really like to sleep tonight. So with that, I think I will go get my coffee and go relax.....or maybe go make a card with my coffee in one hand and a stamp in the other.


Happy crafting,

Gail


Supplies:

Card stock: Night of Navy,Rose Red and Whisper White

Ink: Black

Accessories: Watercolor Wonder Crayons,aqua painter,modern tag punch, dot embossing folder
Tuesday, April 5, 2011

Pink,Simple and Elegant


The stamp set I used to make this card is called Strength and Hope. It is a new set from Stampin' Up! and when I saw it I just knew I had to order it. For every set SU! sells,they are donating $2 to the Breast Cancer Foundation. This foundation is very near and dear to my heart.


My sister was diagnosed with breast cancer this past summer. She has gone through an operation,chemo,radiation and is now on the longest part of her journey...taking meds everyday for the rest of her life to keep the cancer(hopefully,God willing) from coming back. Through it all she was positive and kept her Mary Kay business going. I am so proud of her and she is an inspiration to me and many other people too. Love you sis!!!


With making the card I knew I wanted to make it simple but some what elegant and of course pink. I used the embossing folder and then sponged pink on it to give it alittle more color and the elegant look. The H stamp has the word HOPE under it. It is small and hard to see in the picture. I used the other stamps on the inside...of course I didn't think to take a picture of the inside of the card. I will have to add that another day.


If anyone would like to get this stamp to help the breast cancer foundation let me know and I would be more than happy to help you with that. It really is a great cause.


Happy crafting,

Gail


Supplies:

Stamp set: Strength and Hope

Card stock: Pink Pirouette,whisper white

Ink: Pink Pirouette

Accessories: Pretty in Pink and white grosgrain ribbon,vintage wallpaper embossing folder,scallop punch,sponge

Saturday, April 2, 2011

Embossing folder pop.....


I was planning on posting this card yesterday but never got a chance since I had a sick son home from school. I actually have two sick sons home now.....it is so nice that they love to share their sickness! LOL I gave them jello, a drink and said I need five minutes to myself. So here I am.


Ok enough of that and on to the real stuff....the card.


I've seen cards using this technique with the embossing folders and have wanted to try it but have been doing other techniques first. I finally used it the other day. Another easy way of making something you have used differently and giving you a new look. It really makes the embossed part of the card stand out that much more. I can't wait to try it with other color inks and on my other embossing folders. Give it a try and see what you think.....have fun with it!


Happy crafting,

Gail


Supplies used on card:

Card stock: Crumb Cake, Rose Red,Whisper White

Ink: Crumb Cake

Markers: Rose Red,Soft Suede,So Saffron

Stamp Set: Eastern Blooms

Asseccories: 1/2 " seam binding..rose red, pearls,vintage wallpaper embossing folder,brayer

Thursday, March 31, 2011

Coffee and Mornings go together!


I don't know about you,but the saying on this card is so me!! I get up in the morning and one of the first things I do is turn on the Keurig.Gotta love how fast it is to get that cup of coffee.


Ok enough about the coffee and on to the card. I saw this technique yesterday and had to try it. It took alittle time to do it,but it was easy and I love the results. It was fun to do too. It actually took me longer to decide what image to stamp and color then it did to do the back ground.


So after deciding the image, stamping it and coloring it in, it was on to placement on the card. I had decided on putting twine on the card and it was just not going around it right. I ended up using a double sided tape runner and tape a piece of plain white copy paper and then lining up the twine very close to each other until I had the thickness I wanted. After that I trimmed the ends even and taped that onto the card. I added the flower and placed a pearl in the middle of it to match the tiny pearl in the middle of the flower on the cup.


I love trying different techniques and this is definitely one that I will be doing again.


Happy crafting,

Gail

Wednesday, March 30, 2011

Happy Easter


Here is another card that I made using the set Easter Blossoms. I also did the distressing on the card. With this card I did not add any ink to the edges like I did on the card in the last post. I think it gives a "softer" look to the distressing. It is amazing how just "roughing" up the edges abit adds so much to the look of a card.

I added some 1/2" seam binding to the front of the card. All I did to get it to look the way it does was to put some stick strip tape on the card where I wanted to place the seam binding and then just keep"folding"the seam binding loosely over the tape. It is another easy way to embellish your card and it will/can look different everytime you do it. There is not right or wrong way to make it look. Love that!!!


Now I will be off to the craft studio again to do some more work....or playing as my 6 and soon to be 8 year old boys tell me when I say I am "working".


Happy crafting,

Gail


Supplies for card:

Stamp set: Easter Blossoms

Card stock: Rose Red,CrumbCake,Very Vanilla

Ink: Crumb Cake,Baja Breeze

Accessories: Baja Breeze 1/2" Seam Binding,pearls

Tuesday, March 29, 2011

The Distressed look....

I am so loving the distressed look on cards!! This card was fun and easy to do. All the edges of all pieces of card stock on the card are distressed using my bone folder. Yes I said my bone folder. Some of you might already use it this way,but for those of you that don't should give it a try. Just take your card stock and rub the side edge of the bone folder on the sides of the card stock. It will "rough" it up a bit. The more/harder you rub the more distressed look you will get. I then took the card stock and rubbed the edges in Early Espresso ink to give it a more worn look. I took the piece of card stock that I stamped the image on and crumbled it up(after stamping on it). I then took a sponge and sponged Early Espresso ink over the "creases" of the card stock. I did the same for the tag. For the flowers I used a blender pen and SU! pastels. That gave the flowers the soft color I was looking for. Now if you read my last post I used the same stamp set and said that I had made a card using it that was for spring. The stamp set is Easter Blossoms and I said that you could use the set for other cards not just for Easter cards. This is just one example of that. You could always put a birthday,thank you,happy mothers day saying or anything else you want.

Hope you enjoyed the card and now I am going to go and play with some stamps!
Happy crafting,
Gail

Supplies for card:


Card stock: Pink Piroutte,Early Espresso, Very Vanilla Ink: Early Espresso Classic Ink Pad Twine Large and Extra Large Tag punches Pearls Pastels w/Blender pen

Monday, March 28, 2011

Frame with a border punch!

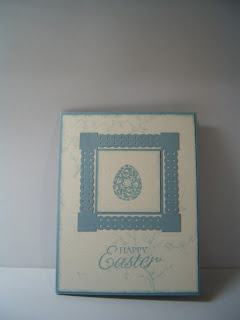
I went to regionals in Hartford Conn. on March 18th and had a blast. We got to see some of the new products coming out in the Summer mini that is out in May. We also got to see some new "tricks" with some items you might already own. One that I LOVE is making a frame using the Dotted Scallop Ribbon Border punch.This is one of my favorite border punches and when I saw how you can use it to make a frame I was super excited!!! It is so easy to do and gives your card a great new look while also giving your punch a new purpose. If you don't already have this border punch you need to get it.


Here is the card I made using it.


I used the stamp set called Easter Blossoms in the Occasions mini. Love it....you can use it for spring time cards,birthday,thinking of you,etc. It is not just an Easter card stamp set.

The card stock I used was Very Vanilla and Baja Breeze. Ink was also Baja Breeze

You can see how I used the border punch to make the frame that the egg is framed out with.


I hope you like the card and it makes you think of ways you might be able to use the punches you already have. I know it has made me think!!


Happy crafting,

Gail